| Table of Contents |
|---|
1 What is the Europeana Metis Sandbox?
The Europeana Metis Sandbox, referenced as Metis Sandbox in the rest of this training, is an online tool to check the quality of datasets that are offered for ingestion into the Europeana database. The Metis Sandbox allows users to get insight in their records, check for any errors and get a preview of what the data would look like on the Europeana website.
...
| Widget Connector | ||||
|---|---|---|---|---|
|
1.2 Who are the intended users of the Metis Sandbox?
The Metis Sandbox is developed with different users and use cases in mind. Examples of users and their use cases are:
Metadata coordinators at an aggregator to
Get insight into the data quality checks and processes that apply to data;
Check the data they are planning to send to Europeana for ingestion;
Professionals at a cultural heritage institution working with metadata to check their datasets before sharing this with an aggregator;
Employees of the Europeana Foundation to check and give feedback on datasets from aggregators.
1.3 What will you learn in this training?
After completing this training you will:
Know how to access the Metis Sandbox
Know how to use the Metis Sandbox
Be able to interpret the outcomes of the use of the Metis Sandbox
Get insight into how to improve the data you want to share with Europeana
1.4 How will you learn this?
There are several exercises in this training. You are asked to complete these exercises and answer the questions.
1.5 What will you need?
For this training you need:
This training document.
A computer with an internet connection.
45-60 minutes depending on your previous experience with working with datasets for Europeana.
Example files for the first few exercises (see instructions below).
A dataset of your own, preferably limited to 50 records (not yet included in this training)
Something to take notes on, physically 📝 (a pen and notebook or sticky notes) or digitally (text editor)
The Metis Sandbox User Guide for reference. You can use the user guide whenever you want to look up more information about the Sandbox.
...
🖱 Click on this link to go to the files for exercise 2.3.
🖱 Click on the download button in the top right corner to download the files as a zip file.
Choose a location on your computer to download the files to, you will need to use this dataset in the first exercise. Unzip this file, you should then have a folder with two files, a zip file and a xsl file.
...
2 Upload a dataset
In the following exercises you will
...
| Note |
|---|
It takes some time for a dataset to be processed by the Sandbox. The order of the exercises is chosen to make the best use of your time. You can choose to skip upload exercises 2.2 and/or 2.3 if you know that these are not relevant for you. This might result in that you have to wait a short time for your dataset of exercise 2.1 to be processed to be able to continue with the next exercises. |
...
2.1 Upload a local zip file in EDM format
📂 You need the dataset Sandbox_Training_Files_2.1.zip for this exercise.
2.1.1 Create a new dataset
...
Go to the Metis Sandbox by going to https://metis-sandbox.europeana.eu/ .
Create a new dataset by clicking on the “create new dataset” link.
...
2.1.2 Specify and upload the dataset
...
✏ Enter a name for the dataset. The name of a dataset is important to be able to identify the dataset later, by you and others. Choose something that is descriptive for this exercise, components to consider are:
Something to identify the uploader of the file, for example your name or the name of your organisation.
Specifics of the dataset and/or its purpose for uploading, for example a version number or in this case that it’s for training purposes.
Spaces are not allowed in names of datasets.
🔽 Select a random Country and random Language from the drop down menus. The Country and Language drop down menus are also for you to be able to identify your own datasets.
🔘 Under Harvest Protocol, select “File upload” if this is not selected.
🖱 Click on the button left of “No file chosen” and select the sample file named Sandbox_Training_Files_2.1.zip that you downloaded in 1.5 of this training.
Leave the checkbox unchecked of “Records are not provided in the EDM (external) format”. This dataset has been converted to EDM already for this exercise.
🖱 Click on the “Submit” button to start your upload.
...
2.1.3 Processing the dataset
...
The processing of the dataset will start. Processing has completed when you see a checkmark appear below the upload icon.
...
📝 Write down this number, you will need this for exercise 3.
...
2.1.4 Review the dataset (basic review)
...
Review any results that are already shown while the dataset is being processed. You will be asked to review the results of the entire processed dataset in exercise 3.1. Look for the processing steps that have
No errors, indicated in green.
Non-critical errors, indicated in yellow.
Critical errors, indicated in red.
🖱 Click on the “view details ()” link, next to the processing steps to see the record names that have errors and details about the errors.
| Info |
|---|
For educational reasons, several mistakes are included in this set. This test set is based on an original dataset of Leiden University Libraries which does not have these mistakes. |
...
2.1.5 Test your knowledge
Test what you have learned by answering the following questions.
...
| Iframe | ||||||||||||||||||
|---|---|---|---|---|---|---|---|---|---|---|---|---|---|---|---|---|---|---|
|
...
2.2 Upload a file on a web server in EDM format
This scenario is for testing purposes of your data, but is not used for ingestion.
2.2.1 Create a new dataset
Open the https://metis-sandbox.europeana.eu/ if you do not have it open yet.
Create a new dataset by clicking on the “create new dataset” link.
...
2.2.2 Specify and upload the dataset
...
Enter a name for the dataset. Spaces are not allowed in names of datasets.
Select a random Country and random Language from the drop down menus.
Select “HTTP upload” as the Harvest Protocol if this is not selected.
Copy and paste the following URL in the URL text box: http://ftp.eanadev.org/uploads/Sandbox_Training_Files_2.2.zip
Leave the checkbox unchecked of “Records are not provided in the EDM (external) format.
🖱 Click on the “Submit” button to start your upload.
...
2.2.3 Processing the dataset
...
The processing of the dataset will start. Processing has completed when you see a checkmark appear below the upload icon.
...
Write down this number, you might need this for the next exercises.
...
2.2.4 Review the dataset
Review any results that are already shown while the dataset is being processed. Look for the processing steps that have
No errors, indicated in green.
Non-critical errors, indicated in yellow.
Critical errors, indicated in red.
...
2.3 Upload a local zip file not in EDM format
📂 You need the files BnF_test_Sandbox.zip and BnF_Manuscripts.xsl for this exercise.
2.3.1 Create a new dataset
Open the https://metis-sandbox.europeana.eu/ if you do not have it open yet.
Create a new dataset by clicking on the “create new dataset” link.
...
2.3.2 Specify and upload the dataset
...
✏ Enter a name for the dataset. See 2.1.2 for more detail if needed.
🔽 Select a random Country and random Language from the drop down menus.
🔘 Under Harvest Protocol, select “File upload” if this is not selected.
🖱 Click on the button left of “No file chosen” and select the sample file named BnF_test_Sandbox.zip that you downloaded in 1.5 of this training.
🖱 Click on the checkbox of “Records are not provided in the EDM (external) format”. This dataset has been converted to EDM already for this exercise. A new upload option will appear.
🖱 Click on the button left of “No file chosen” and select the sample file named BnF_Manuscripts.xsl that you downloaded in 1.5 of this training.
🖱 Click on the “Submit” button to start your upload.
...
2.3.3 Processing the dataset
...
The processing of the dataset will start. Processing has completed when you see a checkmark appear below the upload icon.
...
Write down the dataset number, you might need this for the next exercises.
...
2.3.4 Review the dataset
Review any results that are already shown while the dataset is being processed. Look for the processing steps that have
No errors, indicated in green.
Non-critical errors, indicated in yellow.
Critical errors, indicated in red.
| Info |
|---|
For educational reasons, a mistake is included in this set. This test set is based on a dataset and XSLT file of the National Library of France which did not have any mistakes. |
...
3 Track a dataset and preview in Europeana
In this exercise you will learn how to track a dataset that was previously uploaded and review some quality indicators for it. You will do this with the dataset uploaded in exercise 2.1, but you can also repeat the exercises below with the datasets from exercise 2.2 and/or 2.3.
...
You will practice this in the following exercises.
3.1 Track a dataset
...
3.1.1 Enter the dataset ID
...
Open the https://metis-sandbox.europeana.eu/ in a new window.
Enter the ID of the dataset of exercise 2.1.3 in the text box on the homepage.
The “track” button will change from grey to green and will be active.
🖱 Click on the “track” button
Review the results of this dataset (also see 2.1.4).
...
3.1.2 Preview the dataset on Europeana
...
🖱 Click on the “View published records” link in the top right corner, below the dataset ID, to open a preview of the dataset in Europeana. This preview will open a in a new tab or window. Please keep the sandbox tab open too for the next exercise.
...
| Note |
|---|
It takes up to 15 minutes for previews to generate. If the objects are not shown yet, please wait a few more minutes. |
...
3.2 View a record report
3.2.1 Open a record report
...
🖱 Copy the record ID of the item you previewed in step 7 of exercise 3.1.2. The record ID can be found in the URL of the item. In the URL this is the part after “item” and consists of the dataset ID and record ID. Make sure to include the first forward slash, resulting in ”/dataset_id/record_id”.
Go back to the Sandbox and paste the record ID in the “Enter the id of a record” field.
The “report” button will change from grey to green when a valid id has been entered.
🖱 Click on the “Tier Report” button to generate a report.
...
3.2.2 Review a record report
...
Review the Content Tier Breakdown for the record. This is shown by default.
🖱 Click on the link “Metadata Tier” in the summary or the Metadata Tier icon to review the Metadata Tier Breakdown for the record.
Review the dimensions in the Metadata Tier Breakdown by 🖱 clicking on their respective icons:
Contextual Classes Dimension
Enabling Elements Dimension
Contextual Classes Dimension
...
3.2.3 Compare records before and after enrichment
This exercise allows you to get insight in the enrichtments that have been made to a record.
...
You can now see the differences between both records and the enrichments that have taken place.
...
3.3 Test your knowledge
| Note |
|---|
Before you answer the questions below:
|
| Iframe | ||||||||||||
|---|---|---|---|---|---|---|---|---|---|---|---|---|
|
...
3.4 Problem patterns
...
This exercise allows you to gain insight in the problem patterns that have been identified for a dataset.
...
🖱 Click on the “Issues (Overview)” button, below the dataset tracking report, to open a listing of the problem patterns that were identified for this dataset.
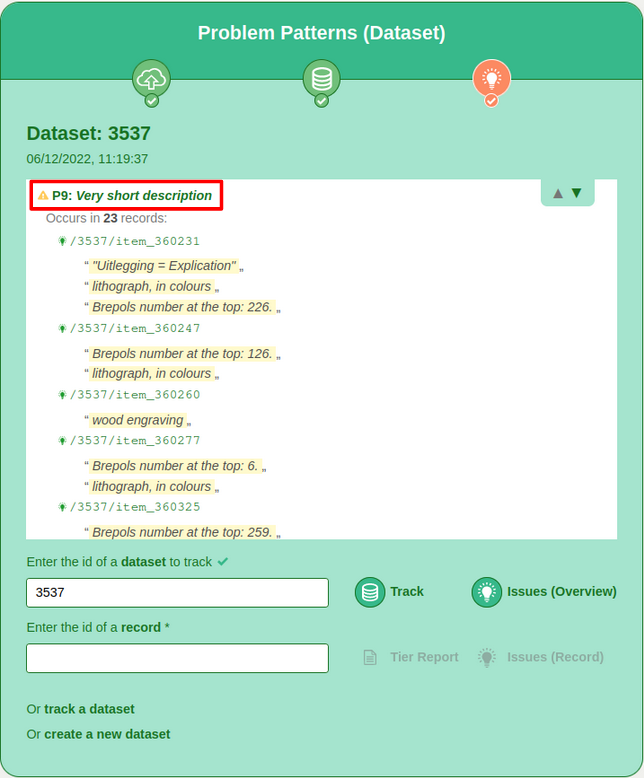

The listing contains problem patterns (e.g. P9 – very short description) with underneath a sample of records where the pattern was encountered along with offending values.
🖱 Click on the problem pattern title of P9 “Very short description”.
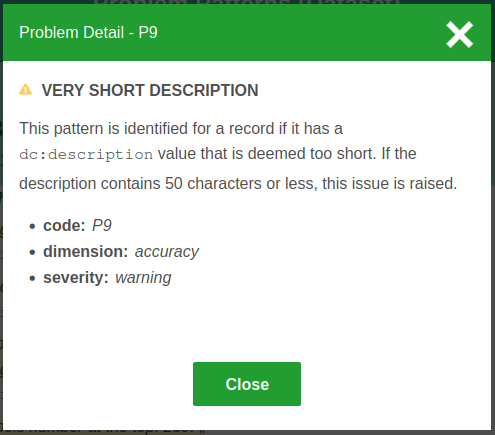

You now see a detailed description of a problem pattern.
The various problem patterns that the application can detect are described in detail in the Metis Sandbox User Guide.
...
3.5 Test your knowledge
| Iframe | ||||||||||||
|---|---|---|---|---|---|---|---|---|---|---|---|---|
|
...
4. End of training and satisfaction survey
Thank you for taking the time to complete this training. Could you share your satisfaction by filling out the survey below? For any questions about this training or to share your feedback in detail, please contact Sebastiaan ter Burg. More information about the process to publish your data can be found on Europeana Pro.
...